
A backpack with an external USB port lets you connect a phone to a power bank carried inside the bag. In the common removable-power-bank design, an internal lead connects the battery pack to a socket on the backpack. Your phone cable plugs into that socket, giving you access to power while the battery stays in its pocket.
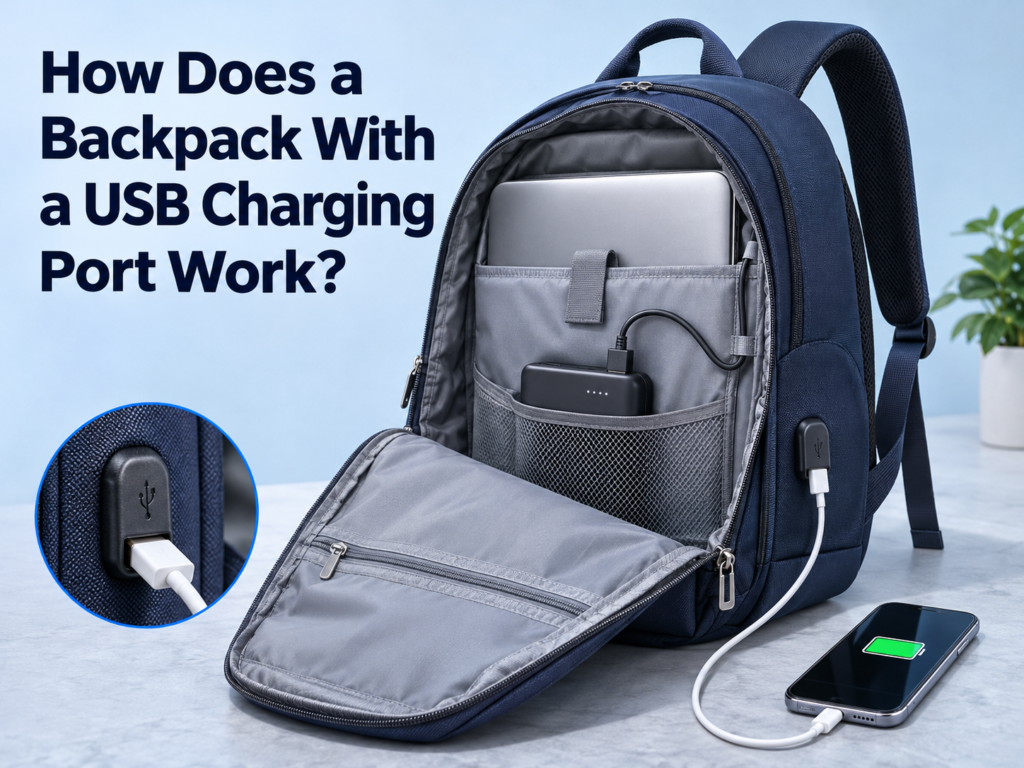
The arrangement is useful when you want the phone in your hand or an accessible pocket. Its performance depends on the entire connection. The power bank, internal wiring, exterior socket, phone cable and device all contribute to whether charging starts, how much power reaches the phone and whether the connection remains stable as the bag moves.
For someone choosing a backpack, the practical questions concern compatibility and ease of use. For a brand developing one, they extend to cable routing, port mounting, electrical verification and replacement parts. Understanding the route from battery to device helps answer both sets of questions.
Follow the power from the battery to the phone
The power bank contains the stored energy and the electronics that provide a suitable output. The backpack’s internal lead carries that output to the exterior port. The external cable completes the connection to the phone, whose charging electronics determine how the available power is used.
Check the product’s included-items list before buying. A backpack may include the internal cable and exterior socket while leaving the power bank and phone cable to the user. A different product may bundle a removable battery. A design with integrated charging electronics needs its own description of the supported power source, output and operating instructions.
| Part of the system | Its job | What to check |
|---|---|---|
| Power bank | Stores energy and supplies power through an output port | Supported output, remaining charge and compatibility with the intended use |
| Internal connection | Carries power between the battery and the backpack interface | Connector type, current rating, cable route and whether it can be replaced |
| Exterior interface | Provides a connection accessible from outside the backpack | Port type, plug clearance, mounting and any cover |
| Device cable | Connects the exterior interface to the phone or other device | Correct connectors and suitable charging capability |
| Phone or other device | Draws supported power and manages its battery charging | Charging requirements, operating temperature and current battery state |
A power bank can have more than one port, with different functions. Use an output specified for powering another device. A USB-C port may support input, output or both, depending on the design. Check the battery pack’s markings and instructions rather than deciding from the connector shape alone.
The source also needs enough charge to operate. Some power banks start automatically when a device is connected, while others may require their button to be pressed. If the phone does not respond, checking the source and its selected port is a useful first step before suspecting the backpack wiring.
Set up the backpack and check the cable route
Begin with a charged power bank and a phone cable you know works. Connect them directly outside the bag first. This establishes that the battery and phone can charge together before the backpack interface is added.
Disconnect them and place the battery in the intended pocket. Connect the internal lead without forcing the plug, then route the lead through any loops or channels supplied. Leave enough slack for the pocket to move when the bag is packed. A cable pulled tight across the main compartment can be caught by a laptop, a zipper or the corner of another item.
Plug the phone cable into the outside socket and connect the phone. Confirm that its charging indicator appears. Pack the bag as you would normally carry it, then check whether opening the compartment, lifting the bag or reaching for the phone interrupts the connection. The cable should have room to follow normal movement without using the socket as an anchor.
Choose a phone-cable length that fits the way you use the bag. A cable to a jacket pocket may need a different length from one to a shoulder-strap pocket. Too little reach pulls on the connectors. Excess cable can hang below the bag or catch when you put it down. Route the lead before walking and disconnect it when the bag and phone need to move apart.
When you finish, disconnect the device and inspect the exposed connections if they have been pulled or snagged. Follow the power bank’s instructions for switching it off, storing it and recharging it. Keep the internal lead in its channel so it is ready for the next use.
Understand what USB-A and USB-C tell you
USB-A is the familiar rectangular connector found on many power banks and backpack modules. A typical arrangement uses an internal USB-A plug connected to the battery’s output and an external USB-A socket for the phone cable. The supported charging behaviour depends on the source, wiring and device. A USB-A socket alone cannot establish the available wattage or a particular fast-charging mode.
USB-C has a smaller reversible connector. It supports several possible power and data arrangements, and the capabilities need to be specified for the actual product. A backpack with a USB-C socket could offer a different charging path from another bag with the same visible socket. Ask what output is supported, how it is connected internally and which source and cable combinations were used to verify it.
A USB-C connection uses a configuration channel to detect attachment, orientation and available current. USB Power Delivery, often shortened to USB PD, adds communication that allows compatible equipment to negotiate supported power. These functions are part of the electrical design and must be preserved or correctly implemented by the system. See the technical guidance on the USB-C configuration channel and the USB Power Delivery overview.
For custom development, have an electronics specialist assess the proposed USB-C architecture. A supplier’s generic extension or panel socket needs scrutiny as an assembly, including its signalling and electrical limits. A successful charge with one phone gives the team a useful observation, but additional evaluation is needed to support a broader compatibility claim. Confirm the applicable USB requirements for the design before choosing the module.
The USB Implementers Forum publishes cable and connector requirements and explains that cables have different capabilities. A capable cable also leaves the source and device subject to their own limits. Request documentation tied to the exact assembly being supplied when certification is claimed. The USB cable and connector guidance describes the relevant compliance programmes.
Work out what limits charging speed
Power is measured in watts and equals voltage multiplied by current. An illustrative output of 5 volts at 2 amperes supplies 10 watts. An output of 9 volts at 2 amperes supplies 18 watts. Those calculations describe the stated output conditions. The phone still needs to support the mode, and some supplied power is consumed or lost before energy is stored in its battery.
A phone’s charging rate can change during a session. Its battery level, temperature and operating load affect the result. Navigation, a bright screen and a mobile connection use power while the device is charging. A percentage that rises slowly can therefore reflect the phone’s workload as well as the charging connection. A nearly full battery is also a poor basis for comparing maximum charging performance.
Cable resistance creates another limit. In a simplified example, a total positive-and-return path resistance of 0.20 ohms at 2 amperes causes a voltage drop of 0.40 volts. The same path dissipates 0.80 watts as heat, using current squared multiplied by resistance. These are hypothetical values to illustrate the calculation. Actual resistance includes the conductors and contacts and needs measurement under the relevant conditions.
Adding cable length and interfaces gives the manufacturer more places to control resistance and contact quality. A poor connection can also become intermittent when the bag bends. If a direct connection charges normally and the backpack route repeatedly drops out, inspect the intermediate assembly and its mounting. Avoid continuing a test through a visibly damaged or unusually hot connector.
Compare direct charging with the complete backpack route
For a meaningful comparison, use the same source, phone, phone cable and similar battery and temperature conditions. Record the direct result, then add the backpack path. A suitable power meter can help show the negotiated mode and delivered power. The test equipment must support the protocol being evaluated so it does not become another cause of a changed result.
Record a period of operation instead of relying on a momentary reading. Also check whether moving the loaded bag or gently flexing its normal cable route produces repeated connection changes. A prototype that works flat on a desk may behave differently when the battery pocket is pressed by a full main compartment.
Describe a fast-charging claim in measurable terms. Identify the intended power, protocol, source requirements and supported configuration. If several devices are to be charged at once, check the source’s shared-output behaviour and the assembled design under that load. A rating for one port may change when another output is in use.
Choose the battery for output and usable energy
Battery capacity and charging power answer different questions. Capacity helps estimate how much energy is available over a trip. Output capability helps determine whether a particular device can draw the power it needs. A large-capacity bank with a basic output can charge a phone for longer while still delivering a lower rate than a smaller bank with a compatible higher-power output.
Use the watt-hour rating when comparing stored energy. Where the label provides capacity and nominal battery voltage, watt-hours equal amp-hours multiplied by volts. For illustration, 10,000 milliamp-hours is 10 amp-hours. At a stated nominal cell voltage of 3.7 volts, that represents 37 watt-hours. Use the voltage associated with the rated capacity, since multiplying the cell-capacity figure by the USB output voltage would mix different reference points.
Energy is lost during conversion, and the phone uses some energy as it operates. Suppose a hypothetical system stores 37 watt-hours and delivers 80 percent of that energy to the device connection. It would provide 29.6 watt-hours there. A phone battery rated at 15 watt-hours would represent just under two such energy equivalents before allowing for the phone’s own charging losses and use. The calculation uses an assumed efficiency to illustrate how energy is accounted for.
For product descriptions, avoid promising a fixed number of full charges without stating the device and test conditions. A useful comparison can identify the power bank, starting device battery level, device settings, measured energy and stopping condition. A label such as “10,000 mAh compatible” also needs a physical fit check because packs with the same capacity can have different dimensions and connector positions.
Choose a pocket that holds the intended battery securely and allows it to be removed easily. Keep the plug accessible and leave room for the cable to exit without a sharp bend. Removability supports inspection, charging, replacement and travel arrangements as well as everyday use.
Check laptop charging as a separate requirement
A laptop may need a USB PD source and power profile that a basic backpack path cannot provide. Check the laptop’s supported input, the battery pack’s output, the cable rating and the complete intermediate assembly. If the laptop needs more power than the system delivers, it may charge slowly, show a low-power warning or continue losing battery charge during use.
A laptop compartment and a USB socket on the same backpack leave that compatibility question open. If laptop charging is part of a custom brief, identify the models or input requirements being targeted. Have the electrical design reviewed for the intended voltage and current, then measure operation through the installed system under representative load.
A dedicated cable opening is another design option. It can let the user route one suitable cable directly from the removable power bank to the device, keeping the selected source-to-device connection intact. Design the opening to protect the cable from abrasion and allow the required plug to pass through. Compare that arrangement with an exterior electrical module during development, using access, weather exposure, serviceability and charging requirements as criteria.
Troubleshoot the system one connection at a time
Start by checking the source outside the backpack with a known-working cable and device. Then reintroduce the internal lead, exterior socket and device cable as applicable. This sequence helps locate the part that changes the result. It also prevents replacing the power bank when the problem is a loose lead inside the lining.
| What you observe | First check | What the result can tell you |
|---|---|---|
| The phone shows no charging indicator | Try a direct connection to the charged power bank’s output | If it also fails directly, investigate the battery, device cable and phone first |
| Direct charging works, but the bag path fails | Inspect and reconnect the internal lead and exterior cable | The added path or its compatibility needs attention |
| Charging stops when the bag moves | Look for a tight route, loose plug or pressure on a connector | Movement may be pulling a connection apart or exposing a damaged lead |
| Charging is slower through the bag | Compare the same equipment under similar conditions | The intermediate path may change the available mode or introduce excess loss |
| A small accessory starts charging and then stops | Check the source’s instructions for low-current operation | Some sources switch off when the connected load is too small |
| A connector feels unusually hot or shows damage | Stop using that connection and disconnect safely | The assembly needs evaluation before further use |
Look inside the battery pocket before assuming the module has failed. A shifting power bank can pull its plug partly out. A cable can also be caught beneath a rigid laptop sleeve or pinched where the liner meets a seam. Repositioning the pack may restore operation, but repeated strain indicates that the routing or retention needs improvement.
For intermittent faults, describe the motion that causes the interruption. “Charging disconnects when the main compartment is full and the right shoulder strap is lifted” is more useful to a service team than a report that the port sometimes fails. Include the source model, device, cable and whether direct charging works. These details help distinguish an installation fault from a compatibility issue.
Use a replacement lead or module specified for the backpack’s construction and electrical requirements. A connector that fits into the same opening may use different wiring or support a different current. If the assembly is permanently enclosed or the damage involves the battery, follow the product’s service instructions.
Keep charging equipment accessible, dry and protected
Follow the power bank and device instructions for use and operating temperature. Keep the pack away from liquids, crushing loads and loose metal objects that could contact exposed terminals. Choose its position so it can be inspected and removed without unpacking every compartment. When packing clothing around it, avoid trapping the battery in a tightly insulating bundle.
Stop using a pack that is swollen, leaking, damaged or unusually hot. If it is smoking, venting or otherwise unsafe to approach, keep clear and obtain emergency assistance. Disconnect an external power supply only when you can do so safely. Government battery-safety guidance describes these warning signs and safe response principles. See the power bank safety guide and rechargeable battery safety advice.
The backpack’s fabric water resistance gives limited information about an exposed electrical connection. Rain can reach the socket, the plug opening or the space where the module meets the panel. An attached cable can also prevent a protective flap from closing. Keep charging connections dry and follow the manufacturer’s instructions if the bag gets wet. A damaged or water-exposed battery needs assessment under its own safety guidance.
For cleaning, disconnect the battery and remove detachable electrical parts as directed. Follow the bag’s care label and keep water and cleaning solution away from contacts. A removable lead can make maintenance easier, but the design still needs clear access and instructions. Let affected areas dry completely before reconnecting equipment, and have damaged parts replaced.
Prepare the power bank for air travel
The battery is the main travel consideration in this setup. Under current US Federal Aviation Administration guidance, power banks travel in carry-on baggage and must be removed if the bag is checked at the gate. Their terminals need protection against short circuit. The usual limit is 100 watt-hours per lithium-ion battery; larger batteries within the permitted range require airline approval. Airlines may impose stricter limits on quantity, capacity or use. Check the operator’s current requirements before departure. See the FAA power bank and lithium battery guidance.
A backpack designed around a removable pack makes that process easier. Keep the capacity label readable and make sure the pack can be disconnected without tools. If the bag has an integrated battery, check the applicable baggage rules for that construction and confirm removal arrangements with the airline. The FAA guidance for baggage equipped with lithium batteries addresses battery-equipped luggage.
Permission to carry a battery and permission to use it during flight can involve different conditions. Follow the airline’s onboard instructions and keep the pack accessible. Before placing a backpack in checked baggage, remove the power bank and keep it with you in the cabin as directed.
Design the charging feature around a packed backpack
For a manufacturer, port location is a product-development decision. Test whether the user can reach it while wearing the bag and whether the cable passes comfortably toward the intended phone pocket. Check the same arrangement when the bag is placed on a desk, a train floor or a luggage rack. A protruding connector can be pressed against a surface in one of those positions.
Support the module with an appropriate backing and attachment method. The shell needs to resist the repeated insertion and removal forces without allowing the socket to twist. Leave enough clearance around the opening for the plug housing to seat fully. A deep decorative recess can prevent some cables from engaging even when the electrical socket is the correct type.
Route the internal lead away from zipper teeth, raw hardware edges and seams that compress when the bag is packed. Provide strain relief so ordinary movement is taken by the routing and retention features. Keep spare length controlled while allowing access for replacement. An assembly sewn permanently behind a liner may be difficult to service after a simple cable fault.
Prototype with the intended battery dimensions and realistic contents. Fill the laptop sleeve, add clothing or equipment and observe what presses on the battery pocket. Check whether the internal cable remains accessible when the compartments are loaded. Test the route with both shoulder straps under normal carry tension, since the shape of the back panel and lining can change.
Define the electrical scope before ordering modules. The brief should identify connector types, intended current and voltage, protocol requirements, cable length and whether power or data functions are required. Specify the complete approved assembly by part number and revision. If the supplier changes a connector or lead, assess the effect on fit and electrical performance before substitution.
Verify the installed assembly before approving bulk production
A phone charging indicator confirms that some charging occurred. Product approval needs evidence for the claimed output and the way the feature survives normal use. Have qualified personnel establish electrical tests appropriate to the architecture, then check the installed module as part of the finished backpack.
| Evaluation | What to examine | What the approval record should identify |
|---|---|---|
| Electrical construction | Wiring, polarity where applicable, insulation and supported connection architecture | Assembly part number, drawing revision and applicable assessment |
| Charging performance | Output under the intended load and any claimed negotiation modes | Source, device or load equipment, cables, readings and conditions |
| Mechanical integration | Module retention, plug clearance, lead routing and strain relief | Loaded bag configuration and observations before and after testing |
| Compatibility | Representative sources and devices across the stated use case | Exact equipment and connection combinations tested |
| Repeated use | Connection stability after agreed insertion, movement and cable-flex trials | Test method, cycle count, acceptance criteria and result |
| Maintenance | Battery removal, access to replaceable parts and cleaning instructions | Approved service method and user-facing instructions |
For a USB-C design, include plug orientation and the intended source-to-device combinations in the evaluation. Have the specialist review the full assembly’s applicable compliance requirements. A generic module marked with a wattage still needs to be checked against its documentation and the way it is installed.
Use the production sample to establish repeatable acceptance criteria. Record output and temperature measurements under specified loads and ambient conditions, with limits set by the relevant component specifications and assessment. Avoid inventing one universal temperature threshold for all battery packs, connectors and use conditions.
During production, retain traceability to the approved module and check the installation before the lining hides it. A pinched lead or reversed route is easier to correct while the panel remains accessible. Agree which routine checks apply to every unit and which validation checks use sampled units. Keep the results linked to the production lot.
Clear instructions complete the feature. State whether a power bank is supplied, show the connection route and identify the supported charging configuration. Include battery access and module-care instructions. Any claim about fast charging, laptop charging, data transfer or water resistance should correspond to the design and verification records.
Choose the backpack for the trip you actually make
The value of the charging feature depends on where the phone stays during use. A commuter who keeps a phone in a jacket pocket may appreciate a side socket close to the strap. Someone who normally leaves the phone in the backpack may find an internal connection easier to manage. Try the route with the bag worn on both shoulders and on one shoulder, then check access while seated.
Judge the rest of the bag with the battery installed. A pack positioned against a laptop sleeve can create a hard pressure point or make the device harder to remove. A battery pocket at the bottom may be convenient for weight distribution but difficult to reach when the main compartment is full. The right position depends on the bag’s structure and the items it carries.
Compare the complete carrying weight, including the battery and cables you intend to use. Examine shoulder-strap comfort, pocket access and room for everyday equipment. Check whether the battery can be removed quickly and whether an internal lead can be replaced through an accessible opening. These details often affect long-term satisfaction more than the appearance of the exterior port.
Before purchase or sample approval, read the charging specification alongside the included-items list. Look for the connection type, supported performance and any equipment the user must supply. For a custom project, put those details into the product brief and review the proposed instructions with the prototype. A buyer should be able to identify the correct output, connect the device and remove the battery using the information delivered with the bag.
Develop a charging-ready backpack with Raketbag
Raketbag supports custom sports bag development through material selection, sampling, branding, packaging and production. For a backpack project with a charging feature, provide the intended devices, removable battery dimensions, preferred connection type and target charging performance. Include how the user will carry the phone and what the main compartments need to hold.
Ask for a prototype that allows the charging route, pocket access and module mounting to be evaluated together. Confirm the electrical assembly with the appropriate specialist and carry the approved part references into the bag’s bill of materials. That gives the sampling, production and inspection teams a common specification for the product customers will use.